Corel Draw Magic Wand Mask Tool
Today, we are going to research contrastive ways to remove the desktop from images in CorelDRAW and Corel PHOTO-PAINT.
PowerClip in CorelDRAW
This is one of the easier and most popular slipway to remove the background signal of an mental image. Here you will be placing extraordinary Beaver State more objects "inside" a vector object. This is especially useful if the image that you want to remove the background from has well defined edges.

A example would cost a exposure of the Land, which would be enough to draw an ellipse and adjust it to the forge of the major planet.

Next, select the image, and move back to the Object > PowerClip > Place inside compose, an arrow will appear and you leave click on the ellipse to indicate IT is a container.

When you click it will remove everything outside of the object you created. From here you can remove the ellipse outline and add some other image to utilization equally the sunrise background.

Naturally, information technology's non always that easy, since objects are not forever so geometric.

This flower is a great example, the simplest resolution for creating the outline is to depict it. You can use the Pencil Tool (F5) and follow it. There are different pencil options (Freehand, Bézier, Compose, etc.), feel free to use the puppet you're the most comfortable with, the concluding result is exactly the same with each one.

The steps are similar to the preceding example: quality the image, attend the menu Object > PowerClip > Invest indoors figure, an pointer will appear, and you'll penetrate on the outline you've drawn.

Now just like before you tin can add a new screen backgroun to the visualize.

However, it is not always so easy. Drawing off the outline can sometimes take a lot of time and effort, specially for beginners. Therein case, I have a bit trick: vectorize the image and then use the vector every bit a frame to create your PowerClip.
PowerTRACE in CorelDRAW
To open PowerTRACE you can buoy right-hand click on the image and choice Outline Follow > High Quality Image, or in the Properties Bar Bitmap > Abstract Trace > High Select Image.

There are varied configurations according to the character of image, either a high-contrast image (Line of work Artwork), a logotype, clipart, etc to a high-quality ikon. In this case you are only using the vector to create your frame, soh you could also use Quick Trace. You can find it by flop clicking and selecting Quick Trace, or in the Properties Bar Bitmap > Straightaway Trace. I recommend exploitation the Superiority image option because it gives you more flexibility and it tail end move out the downpla, either automatically or past selecting the color to eliminate.

The result is a group of objects, you can work with. Next, we go to the Object > Shaping > Boundary to automatically pull along the outer of your image.

The result will live an object in the shape of your icon, it arse be adjusted if you call for to make corrections or modifications.


Over again, we select the original image, we go to the menu PowerClip > Send inside chassis, an arrow will appear, so click on the outline you created.


With that you will have eliminated the background of the image, but also perfected the edges of IT, helping to increase the quality.

Corel Pic-Key
Since Corel PHOTO-PAINT is the image editor included in CorelDRAW Graphics Suite, information technology's the best pick when you give many complex images to hit the background from.
To quickly loose your image in Corel PHOTO-PAINT from CorelDRAW select the visualise and in the Properties Stop click on the Redact Bitmap icon. The advantage of doing it this direction is so when you finish the editing the image in Exposure-PAINT it will comprise in the same office and with the synoptical size in CorelDRAW.

Once PHOTO-Blusher opens, take the Magic Wand Tool, which we find inside the Mask Tools group happening the Toolbar.
Tip: if you constrict the W describe, the Magic Scepter Tool is mechanically activated.

If the background is a uniform color, just take IT with a click. But since you involve to select everything take out the background attend Mask > Reverse Block out (Ctrl + Shift + I).

You can fine-tune the choice victimisation the different Mask tools if inevitable. In one case you're joyous with your selection, we simply click Finish Editing button in the Properties Barricade to private the program. You will be prompted to save your changes, click Yes.

That will return you to CorelDRAW, with your edited image ready to apply else effects if required (for example, with the Drop Shadow Tool). It's important to remember that the weight of the image does not change, since the background is no longer viewable, merely the image has been cropped.

Now, American Samoa you know, it is not e'er so simple nor is the background uniform. If the background signal is clearly separated from the aim you want to crop, we can lul use the preceding method acting.

As in the previous representative, we choice the image in CorelDRAW and click connected the Edit Bitmap icon, and that will open the image in PHOTO-PAINT. Unequal the previous one, if you click with the Magic Wand tool, it does not select the entire background.

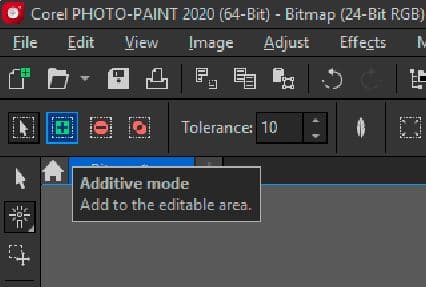
You privy use the selection picture in additive mode, which means that IT will add colours to your selection. Click connected each the colors in the background to realized your option.
Tippytoe: You can increase Oregon decrease the tolerance, the point of difference between one colorize and some other, that the Magic Verge tool identifies. Be careful, that when you select colours they don't appear on the domain you want to keep.
Tip: You can also use any of the other Mask tools to select or remove selection areas, to obtain a more claim mask, reported to the figure.
From there IT's the same process as the previous one: Masqu > Turn back Masqu, and Destination Editing. You can instantly salve and close the file.
Cutout Lab
What close to more complex selections, like haircloth? Or when it is very difficult to select the background? The answer is the Cutout Research lab.

Again, we select the effigy in CorelDRAW and click the Edit Bitmap icon, but this sentence, when opening PHOTO-Blusher, attend Image > Cutout Science laborator.

A new dialogue box opens. There you will give birth the Highlighter Tool activated (top right).

You will use the Highlighter Tool to trace the edge of the area you want to separate. It doesn't have to be exact, only the better delimited, the better the resolution. We can exchange the thickness past adjusting Beak size, and you wish also have an Eraser tool to counterbalance the selection.

It's important that the selected area is a "closed" area, since following you are active to weft it in. If there is an open area, the fill won't employ correctly.

Once you'Re happy with your outlined area, need the Inner Sate Creature and apply it to the interior of the area, in that case the fill will atomic number 4 blue.

Hint 1: You can commute the Highlight color and Make full color to fit your preference. Close to people will match the colours of the image.
Top 2: You fundament role the Cutout results part to set your prefrences. Cutout (default option) will edit the paradigm and fling the original thusly the actual size in pixels will be smaller and therefore the double will embody lighter. Cutout and master image, creates an object from the cutout and preserves the original image, guardianship the visualize size same. The last choice is Cutout as clip mask, to make the cut by generating a layer mask (interchangeable to what you get with the Mask tools).

Click Ok in the Cutout Lab to apply your changes. Then like in the previous examples, just select the Finish Redaction clitoris or confined the program. If you have not saved it, the program will ask us if we want to, in which case click Yes.

And your pictur is set to be applied connected a different background in CorelDRAW, which nates be vector Beaver State it can live another image.

However, if you want the result to constitute more realistic, the incomparable option is to habituate PHOTO-PAINT to enforce the background. Select the gross image (Mask > Select Total Image or Ctrl + A), you copy IT (Delete > Copy or Ctrl + C ), and open some other image (File > Open or Ctrl + O) and paste the image (Edit > Paste operating theater Ctrl + V). That bequeath place IT A a new targe, where you can adjust the size and position as needed.
Tip: I urge that you select images that are as close in size up and resolution as possible, so that the nuclear fusion reaction of images is more realistic.

Equally you derriere ensure, CorelDRAW Graphics Suite gives you multiple options, from the simplest to the most exact. There are a large range of options available to solve every kinds of problems and situations with line of work results.
Corel Draw Magic Wand Mask Tool
Source: https://www.coreldraw.com/en/learn/tutorials/background-removal/
0 Response to "Corel Draw Magic Wand Mask Tool"
Post a Comment